A Comprehensive Guide on How to Replace Patio Screen Mesh
Replace patio screen mesh may seem like a daunting task to some, but with a step-by-step guide, you can easily perform this task at home and save a lot of money.
Step 1: Preparation
Before you start the process, make sure you have removed the old mesh and spline. Lay the screen door on a flat surface to begin with.
NOTE: Ensure you have the right tools for the job. You would need a new mesh, a spline, a screen rolling tool, a pair of scissors, a flathead screwdriver, and a utility knife.
Step 2: Positioning the New Mesh
Place the new mesh across the frame such that it overlaps all sides. This will ensure you have enough material to work with.
Remember to secure the mesh properly to prevent it from becoming uneven or gathering up.
Step 3: Securing the Mesh
Use tape or clamps along the bottom edge of the screen to keep it taut against the frame. This will keep the mesh in place and make the task easier.
Step 4: Creating a Crease
Using the pointy edge of the screen rolling tool, push the mesh into the frame channel along the top of the frame, creating a crease for the spline to be inserted into.
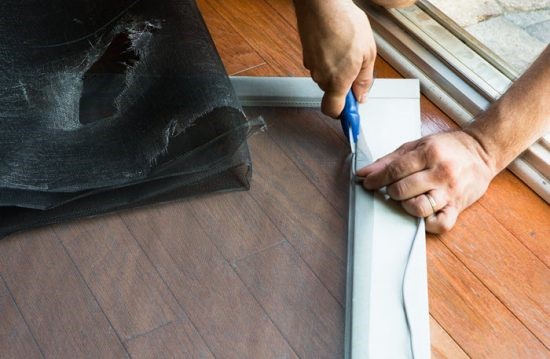
Step 5: Cutting the Patio Screen Mesh
Make a diagonal cut at the corner of the frame using a pair of scissors. This will provide some relief to the mesh and prevent it from bunching up in the corners.
Tip: Be careful not to cut a hole in the new mesh. Only cut up until the corner of the channel frame.
Step 6: Inserting the Spline
Start pressing the spline into the frame channel using your fingers. Don’t worry about getting it fully inserted, as the screen rolling tool will handle the rest.
Step 7: Pressing the Spline
Now, use the grooved edge of the screen rolling tool to press the spline into the frame channel, ensuring to keep the screen taut. This might require rolling the tool back and forth over the spline a few times to get it properly seated.
Step 8: Routing the Spline
When you reach the corner, manually route the spline around it. Make sure it doesn’t get bunched up at the corner, and ensure it remains taut around the entire frame.
Step 9: Cutting the Patio Screen Mesh Again
When you reach the bottom (taped) edge, partially remove the tape to make another diagonal cut in the mesh. Remember to remove the tape section by section and continue pressing the spline into the frame channel.
Step 10: Finishing the Spline
Once you reach your starting point, trim the spline so that it fits snugly against the beginning edge without any overlap.
Step 11: Inserting the Spline Fully
Use a flathead screwdriver to carefully push the spline into the frame channel until it is snug. Be careful not to introduce a hole in your new mesh.
Step 12: Trimming the Excess Mesh
Lastly, use a utility knife to trim the excess mesh around the frame. Use the outer edge of the channel and spline as a guide for a straight, clean cut.
Conclusion
And voila! You have successfully replaced your patio screen mesh. Follow these instructions in reverse order to reassemble your device.
Remember, patience is key in this process. The more time and care you put into this task, the better the results will be. Happy DIYing!